Bullet Factory: 3D games created on a prompt
Table of Contents
- Prior Work, Inspiration, and Goals
- What using Bullet Factory looks like
- Project Structure
- Enhancing LLMs with mechanical operation
- The tools that help make the tool
- Conclusion & Next Steps
I wrote a checklist and template project that generates 3D Vampire Survivors-like iOS games based on a prompt. Read on to understand how creativity can be templatized and how badly the LLM can fail in following directions (and be corrected).
Prior Work, Inspiration, and Goals
I am a game developer. One of the more fun things to do during development is to add game juice to a game… supplemental sounds or visuals that greatly enhance the experience.
Last year I created a game where you play as a corgi fighting off hordes of monotonous office workers. It's a Bullet Heaven/Vampire Survivors-like where you grow more powerful as the hordes that come at you increase in strength and number.
This genre (Vampire Survivors-like) is really special because it's formulaic but still quite engaging. There's a gameplay loop where the player is always getting stronger as the enemy hordes progress, so every aspect of the game enhanced by game juice becomes even more intense as time goes on (e.g. enemy deaths, number and speed of projectiles launched by player, gold pickups).
I wanted to see how much of the Vampire Survivors formula could be followed by a coding agent, while still building out a unique-looking game. The answer is... pretty much all of it. And yet as the process matured, I did find that the games had a certain similarity.
What using Bullet Factory looks like
Bullet Factory is a Typescript project. You create a project by copying over the template into its own directory (we're creating a game samurai with a description):
Then running the SOP script (see SOPs):
That's it. The sop script spends a couple hours going through each aspect of gameplay, coming up with weapons, progression details, level generation, enemies, particle systems, UI, and so on.
After the game is fully developed, you can compile and bundle the Typescript app into iOS:
Project Structure
The template project that we copy at the beginning is in template/. It contains a checklist, template/SOP.md, for developing the game. It references lots of other markdown files in patterns/ which contains best practices on developing certain game aspects. For example, level-generation.md, spawn-waves.md, and cross-browser-testing.md.
In template/src/, there is code that the coding agent uses to develop specific parts of the game. I could have described all this in patterns/ markdown files. But keeping it as real code made it possible to build debugging tools against it in tools/ (more on this below) to manually tweak and verify more complex libraries of the game work.
Last, there's an ios/ directory that uses Capacitor to wrap the compiled Typescript application for deploying an app for iOS.
Enhancing LLMs with mechanical operation
As the cost of LLM tokens becomes so cheap with providers like Anthropic and OpenAI, it's tempting to use coding agents to do many of the tasks that were traditionally done by scripts. For example, searching for a phrase in a document, converting text between different formats, and copying text from one location to another with small tweaks.
However, as the coding agent is asked to comply with more standards (from CLAUDE.md/AGENTS.md files, skills, file output, and tool usage output), the agent's adherence to any one specific instruction gets worse.
When it doesn't follow instructions, the coding agent will admit its mistake and tell you it's not your fault. But ultimately it's you who has the failed result when the coding agent doesn't follow directions.
In Boxworld and AI Pipelining, I touched on how I got the coding agent to loop, making changes to the ML training until it succeeded. However, in this project, I ran into situations where it was very difficult to describe the problem:

I started asking for property-based tests to reduce the situation where the coding agent would solve a problem for a specific case but not generally. I wrote pseudocode several times to more rigidly communicate the tests I wanted the coding agent to run to verify its work:
But in the end, the coding agent's actions couldn't extend beyond a single context window and there was no one to verify that the agent succeeded without cheating, besides itself or me.
Another problem is that although tokens are cheap, there's still a nontrivial latency required per token. Asking a coding agent to convert a thousand lines of data into another format, even if its output is correct, can take quite a long time because you must wait for it to generate each new token of the new format.
What I learned from solving the problems was to ask the coding agent to write and use specialized scripts to do anything that doesn't require cognitive oversight (three strikes and you create a tool).
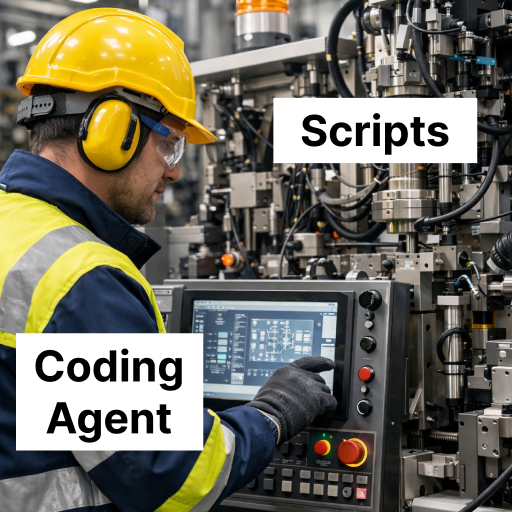
Besides being orders of magnitude faster than a coding agent at completing the same tasks, using scripts also increases the chances that the coding agent listens to instructions because you can just surface them when needed… just-in-time prompting.
For example, you can remind the coding agent that partial successes are fatal:
As I was working on Bullet Factory, what I wanted more and more was a deterministic way of executing a large number of tasks, while keeping the format legible to humans. So was born the sop tool.
SOPs
Many years ago, I discovered the value of checklists. Strength training, traveling abroad, and weekly reviews. I had checklists for everything.
The most helpful improvements I made to the checklists were adding code. Like how machine operators will point and call out aspects of their process for safety, I would read the best practices I included in my checklists and then run the code for that digital action:
However, it was due to my friend Tasshin's insistence on using SOPs in many of his processes that I realized an SOP was what I needed in Bullet Factory to consistently get the coding agent to develop games.
SOP stands for Standard Operating Procedures. They're a set of instructions for executing a plan in a consistent way, such as landing a plane, hosting a dinner party, or migrating a database between providers. An SOP is pretty similar to a checklist.
I wanted an sop tool that could follow an SOP in execution. It would be as format-agnostic as possible, so as long as the coding agent knows how to read tasks from and write updates to a document, it works. That means markdown, Google Docs, and issue trackers should all work (assuming the coding agent has read/write access).
In addition, my intuition told me that reading/writing the tasks, doing the tasks, and verifying the tasks should all be done by different agents. The core belief was that the agent that did the actual work became less capable of following directions after filling its context window with the actual work. Therefore, it shouldn't be verifying its own work or updating the SOP document.
Here's how the coding agent executes the steps in an SOP using the sop tool:
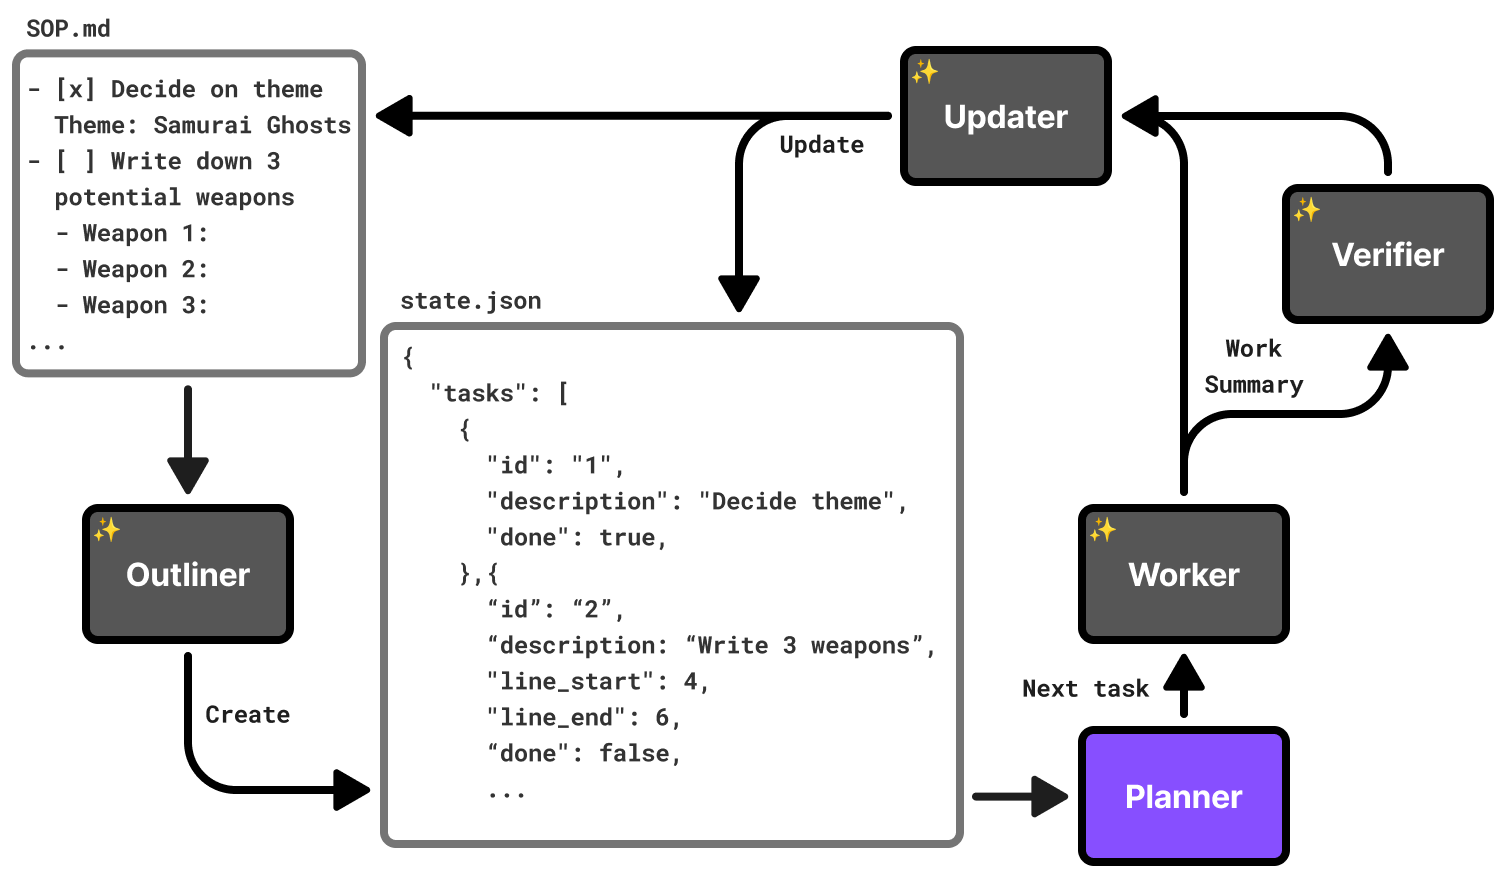
- The Outliner (coding agent) converts the document into a local, intermediate format (state.json). Notice the optional line_start and line_end used to reduce how much output is requested from the Outliner.
- Loop until Planner says there are no tasks left
- The Planner (code in sop) pulls N tasks from the intermediate format and writes them into a prompt for the Worker.
- The Worker (coding agent) completes the task and returns a summary of what it did.
- (optional) If the Outliner thought that any of these tasks needed verification (based on the SOP or its own judgement), run the Verifier (coding agent) to check the Worker's work. If the Verifier counts three failures in-a-row, it prints the error and exits the tool.
- The Updater (coding agent) uses the work summary to update the intermediate format state.json as well as the original SOP.
The Outliner can also mark tasks as requiring user approval, if the SOP indicates it. For example:
The original sop tool had more agents and they each ran the best model available. However, after running worse models on the same inputs and checking their outputs, I found that only the Outliner and Worker needed the best models (Opus 4.6), spending the most tokens. I demoted the rest to cheaper models (Haiku).
Game development phases
Bullet Factory develops games in three phases, loosely based on a game industry standard: pre-production, grayboxing, and asset generation.
In pre-production, the coding agent essentially fills out worksheets to guide the process. A lot of creative decisions have to be made in the course of developing a game. As a result, the first part of Bullet Factory's SOP, pre-production, asks the coding agent to answer questions to flesh out the game's mechanics and aesthetic.
Next is the core development with grayboxing. Generating complicated assets too early makes iteration slower, so game development teams usually pin down core mechanics, using "gray boxes" as stand-ins for 3D assets. In our case, the sop tool pauses to allow the user to see how the game development is going to feel without waiting for the asset generation to finish.
All the materials for the 3D assets use one of these graybox materials:
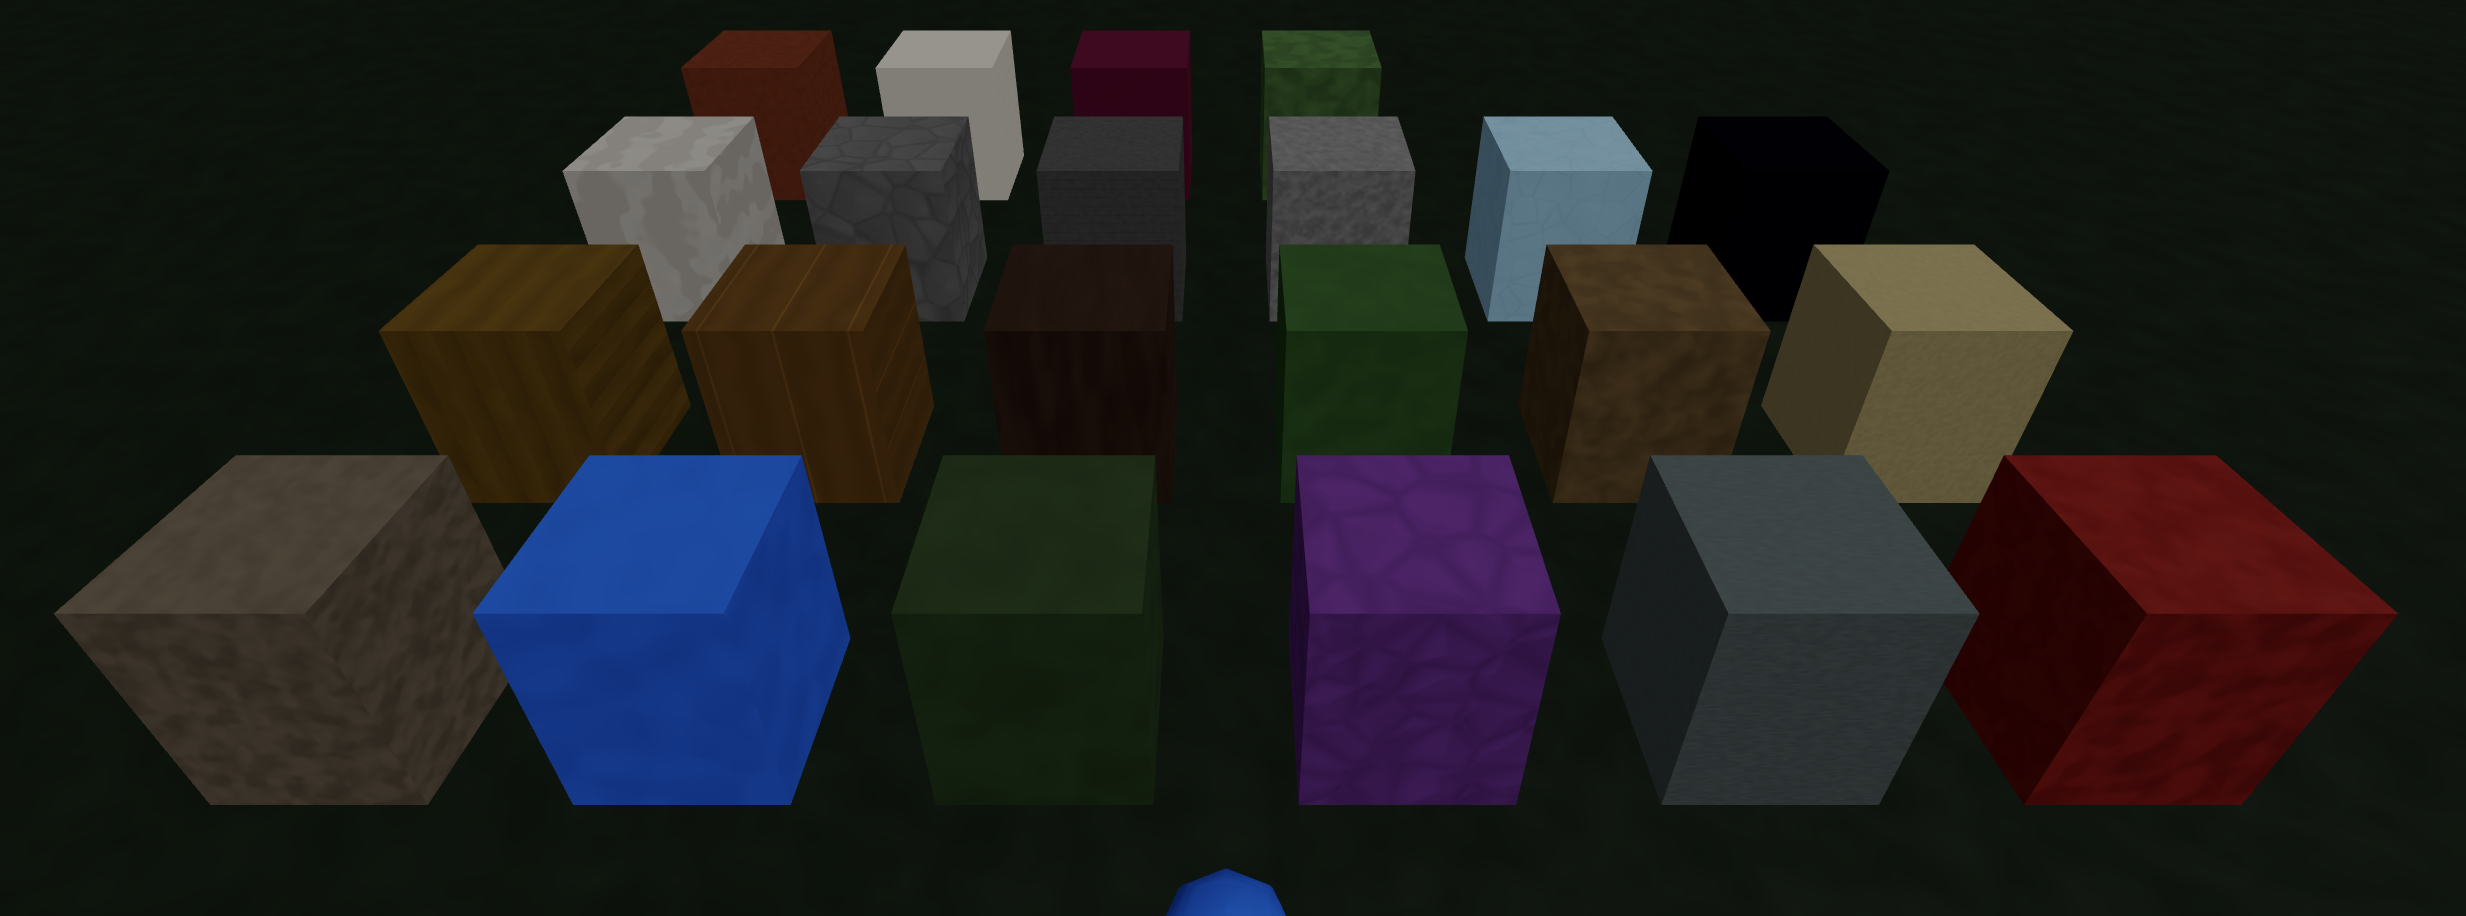
npm run dev graybox-material shows the stand-in graybox materials
Finally, it generates 3D meshes with humanoid armatures for animation. Weapons, pickups, destructables, and level terrain objects all get 3D meshes, just without animation. Additionally, the user will be asked to swap the template sound effects with more appropriate ones from a sound effect library (more on this later).
The tools that help make the tool
The mini-projects in tools/ and scripts/ helped me to verify that the features in the template code worked correctly, as it's hard for the coding agent to know when it's made a mistake with visual content e.g. constructing geometry at runtime for level generation.
The SOP also asks the coding agent to keep a standard GameSpec value so changes to color palette, weapon definitions, enemy waves, music tracks, fonts, etc can be rewritten by the mini-projects.
GDC semantic database
Over the years, I've learned a lot from the GDC (Game Developer Conference) talks uploaded to YouTube. A previous project where I made videos semantically searchable made me realize how much value there was in quickly searching by meaning through a large collection of video content.
I asked the coding agent to download all the transcripts from the GDC talks on YouTube (using yt-dlp) and put them all into a vector database (LanceDB and nomic-embed-text) for quick semantic searching. The SOP covers a lot of different topics and I wanted as many of Bullet Factory's aspects as possible to benefit from the wisdom of seasoned game developers.
I regularly asked the coding agent to make queries and search through the GDC database, updating the SOP with best practices.
For Intellectual Property reasons, I did not include the actual transcripts, only the scripts I used to fetch and search the database.
Profiling
Frame drops usually happen when the CPU is doing too much game logic in one frame or the GPU is making too many draw calls. Normally, game developers notice frame drops either because the game visibly stutters or they automatically track the frames per second.
There are lots of straightforward ways to reduce frame drops that the coding agent could use (octrees to quickly find objects closest to others, object pooling to reduce garbage collection, GPU instancing or vertex animation texturing to reduce draw calls, ...). But like humans, they don't know where to focus on improving if they don't know what code is taking up the most time.
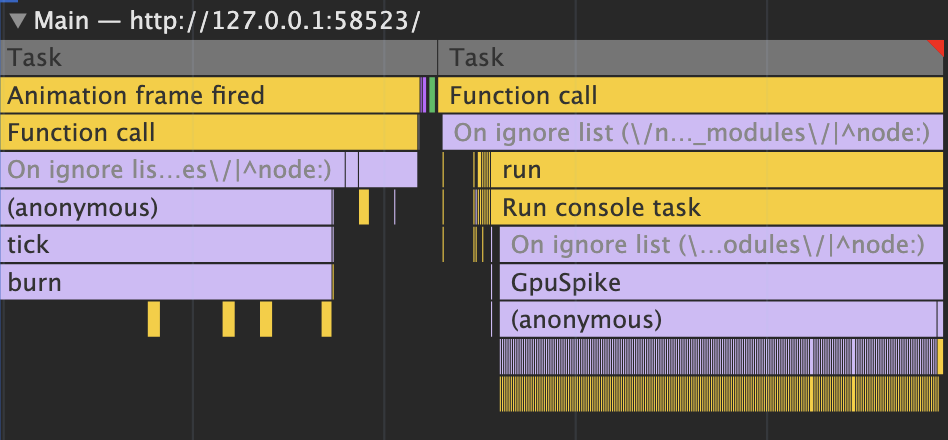
Humans look at these flame graphs (above) to figure out how each frame's time is spent (~16ms when targeting 60 frames/sec). The coding agent needed some way to get this kind of information as well.
What I did was ask the coding agent to use the Playwright MCP server to launch a browser and play the game, moving the player around and reading profiling information in the console:
PROFILE=1 npm run dev profile artificially slows the CPU and GPU to test the profiling library
Profiling a specific section of the code looks like this:
The environmental variable PROFILE is not defined by default, so the Typescript compiler knew to strip these out unless we were profiling (dead-code elimination).
Level Generation
The first phase of level generation uses cellular automata to initialize a flat map with open (ground) and blocked (wall) grid squares:
- At the start, each grid square's chance of being closed is 30% + density * 80% (in our case, density varies from 12% to 25% depending on the area).
- Next we run N iterations (one to three, usually) of the cellular automata rules (B5678/S45678):
- If the grid square is open and has 5+ closed neighbors, it becomes closed.
- If the grid square is closed and has fewer than 4 wall neighbors, it becomes open.
- Otherwise, they remain the same.
npm run dev level-ca visualizes the cellular automata
There are many phases after the cellular automata. Most of them borrow from Joris Dormans' work in Unexplored 2, relating to theory of place, and graph grammars.
One of the biggest functional changes I borrowed from Dormans' work was having progression built in. The coding agent is asked to make the first, central areas spawn easier enemies, while the outer areas are more likely to have elite enemies and hazards that hurt the player.
npm run dev level-heightmap generates 3D levels
On the aesthetic side, the grid structure was kept but many of the walls were visually carved using marching squares and then smoothed to give the walls a more round, organic feeling without actually changing whether the player could move there or not.
Pathfinding
A Vampire Survivors-like game might have 500-2000 units pathfinding at any point in time. When I worked on my corgi game (see Prior Work, Inspiration, and Goals), I found that the built-in Unity library for pathfinding that made sure objects didn't collide was too slow.
In that project, I used the RVO2 simulator library with some manual optimizations (e.g. only running it every few frames, not keeping the whole path in memory) to get 1000+ animated units to independently pathfind.
Accurate pathfinding, without recomputing it every frame
However, Bullet Factory uses a simpler approach:
- An enemy's line of sight of the player is quickly calculated by walking a line from the grid square the enemy is on to the player and see if it hits any "closed" squares. If not, then the enemy's movement direction is straight towards the player.
- If the enemy's line of sight is blocked, it uses a flow field towards the player that's re-calculated whenever the player moves to a new grid square. The flow field originally used simple breadth-first-search but later switched to using Dijkstra's when the Level Generation added slopes.
- After the enemy moves, there's a push back force to reduce enemies overlaping each other. The push back force is calculated by looking at how close the other enemies are in neighboring squares (we track which grid square each enemy is in with spatial hashing) and summing together the 2D vectors that point back towards that particular enemy unit.
npm run dev pathfinding -- --serve tests out Bullet Factory's pathfinding
3D Mesh
This project wouldn't have been possible without the ability to generate 3D meshes based on a prompt. I used Meshy to generate all the meshes for the games.
The tool allows the user to view all the 3D files that have been generated by Meshy:
npm run view-mesh -- **/*.glb shows all generated GLB mesh files
Meshy does provide image textures for adding color to the meshes it generates. However, in order to more consistently color each mesh according to the game's palette (see Palette), Bullet Factory discards the texture and colors it using custom graphics shaders.
Meshy does not apply different materials to different regions of the mesh. So here, we take advantage of the multi-modal capabilities of LLMs. It comes up with rules on how to break up the mesh into regions to color them differently and then analyzes the images of it at different angles, repeating this loop until it seems close.
Specifically, we ask the coding agent to separate every part of the mesh into regions using the values of these six inputs:
- Height from the ground
- Distance from the center column of the mesh
- Left-right position
- Front-back position
- Vertical steepness of the slope mesh at that point
- Whether the surface of the mesh is facing down or up
It does a surprisingly good job at identifying regions on most meshes, but not all unfortunately. If I spent more time on this project, this is an area that I would like to improve.
Palette
All the visual styles in each game are influenced by its palette. The palette is generated using Inigo Quilez's cosine palette technique, which I often use in generative art because it maps continuous values onto a continuous, distinct color space.
Next, we convert each color into the OKLab color space to validate whether or not they're perceptively distinct enough from each other. The player should stand out from the enemies, all the units should stand out from the ground and closed off areas, and the ground should be distinct from the closed off areas.
If they're not distinct, we throw away the palette and generate a new one. In this way, the games are not necessarily realistic looking, but they are visually distinct. If I had more time, I'd add cel-shading with simple lighting/shading.
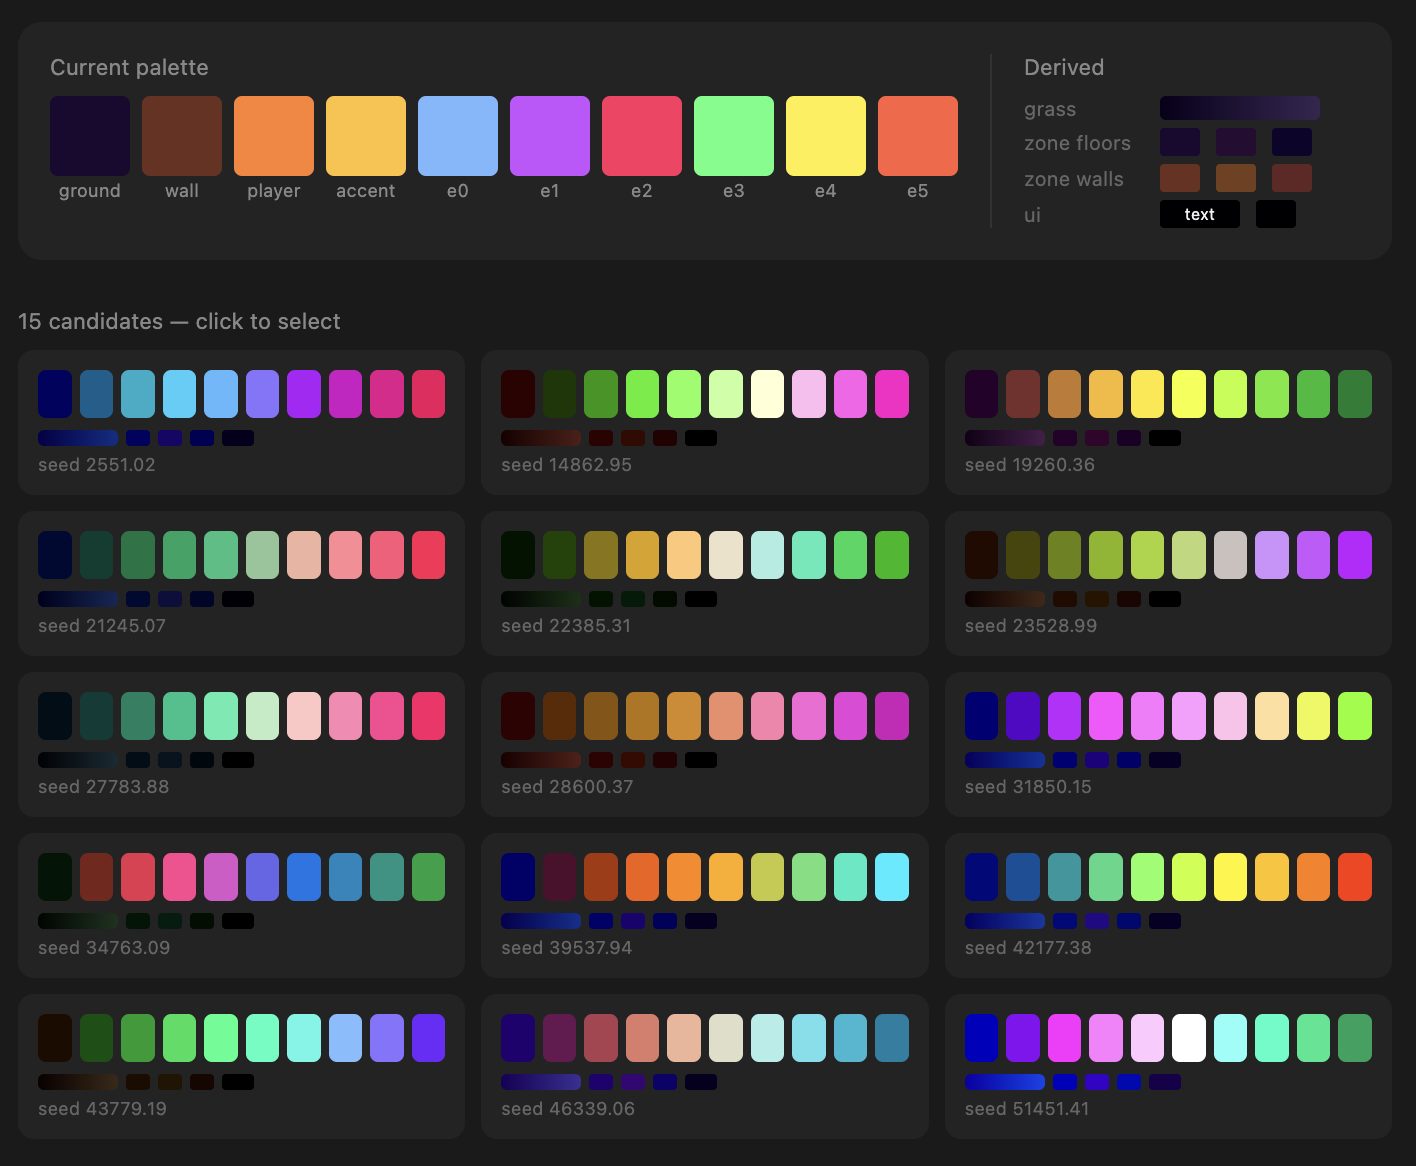
npx tsx scripts/preview-palettes.ts
Foliage
Foliage is a simple (albeit not always performant) way to make a place feel less empty. In a GDC talk, Gilbert Sanders describes how they made the foliage and grass in Horizon Zero Dawn very performant by putting images on clusters of 3D rectangles (quads).
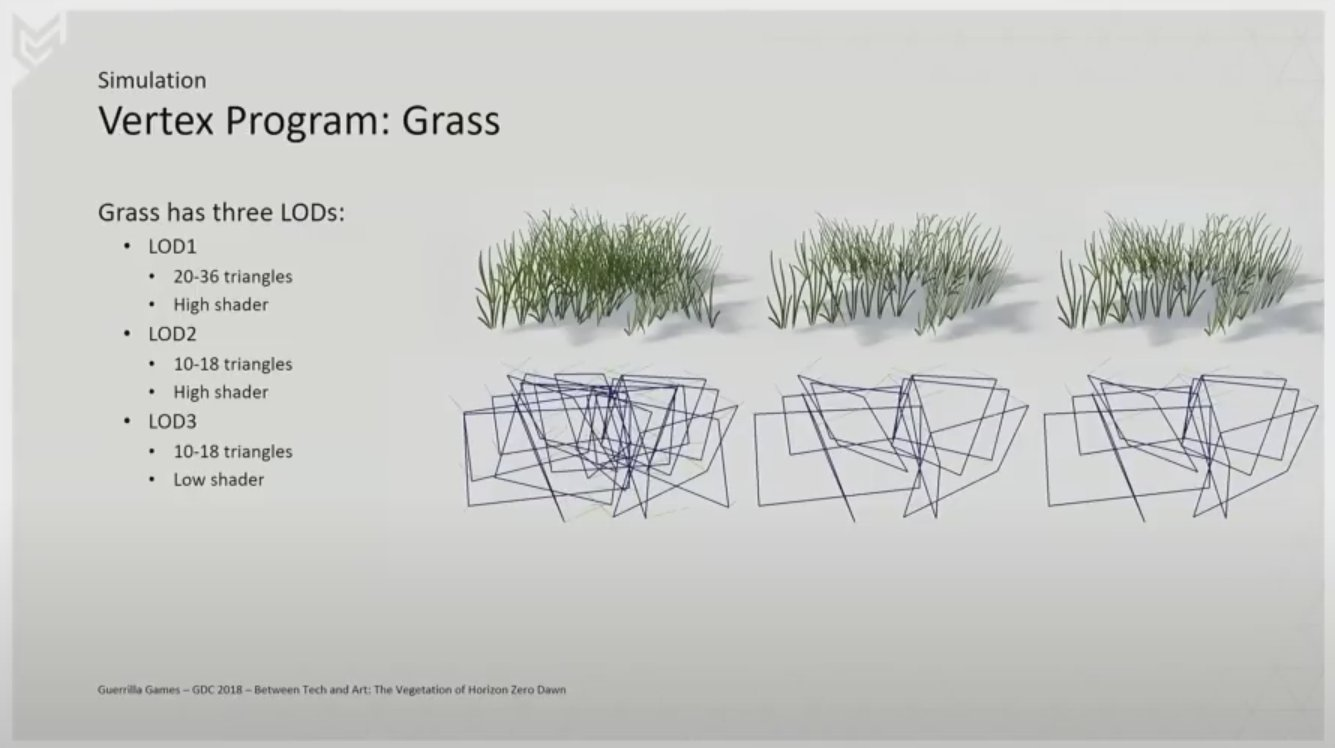
I asked the coding agent to replicate the effects from the GDC talk and it delivered extraordinarily well:
npm run dev grass lets us touch grass
Since I didn't have any images of grass on a transparent background, I asked the coding agent to write a graphics shader to construct the grass image using math in the graphics shader:

These shapes are all drawn using math in graphics shaders, not images
As long as the coding agent can write a graphics shader to depict the foliage in 2D, it could make them look 3D. Look at these beautiful flowers!:
Particles
One way to add game juice is with particles. Initially, I asked the coding agent to write particles from scratch, but there were too many visual artifacts.
Afterwards, I came up with some presets it can choose from and adjust as needed:
npm run dev particle-demo
Post-Processing
Post-processing is when you make changes to the look of the screen after it's all been rendered from 3D. It's one of my favorite things to work on in games.
An ASCII shader running over Doom Eternal gameplay
That being said, I was giving this job over to a coding agent and wanted to make sure that they had the capability to create complicated visuals.
I asked the coding agent to use the same interface that my psychedelic graphics article series uses. The coding agent only has to write part of a graphics shader, with the use of many helper functions, to produce different effects:
npm run dev post-processing runs post-processing over a sample level
Audio
The coding agent has no sense of taste with respect to sound. We can label sound effects to help it choose, but I thought it made more sense for the user, who is both developer and player, to make these choices.
There's an audio-sfx tool that lets the user sample and swap out sound effects from Kenney by their purpose in a game:
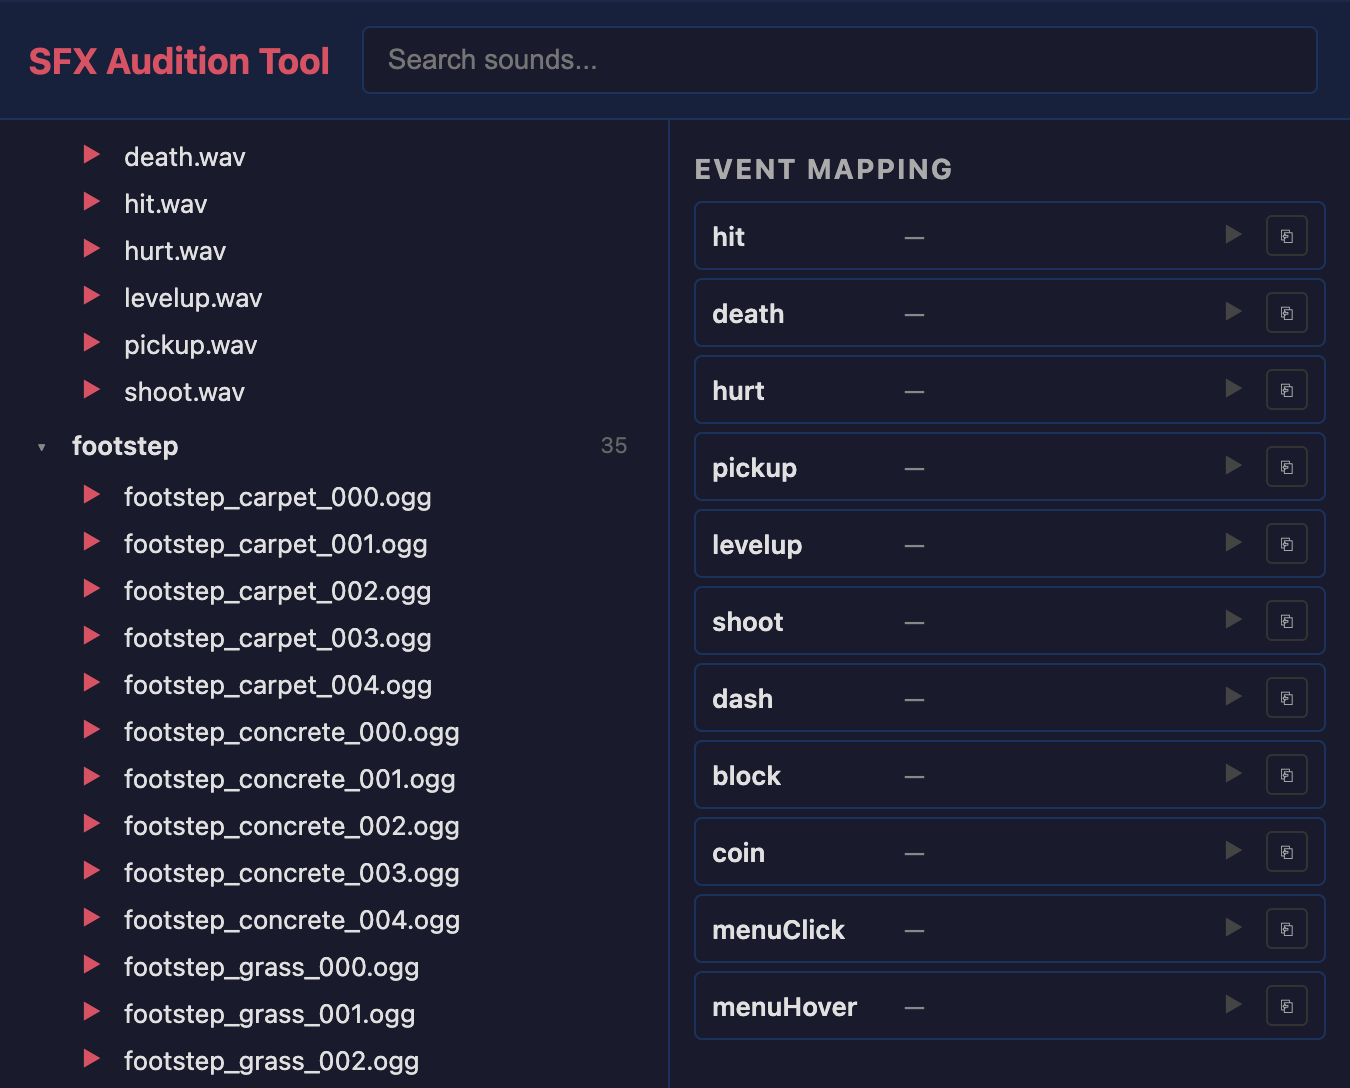
npm run dev audio-sfx
Music is generated during the course of development (using one of Fal.ai's models) based on how the coding agent filled in the pre-production stages. However, to test it out, you can generate music on a prompt:
Last, to test out the transition between music, there's a tools/audio-music/ mini-project that plays some pre-generated music and demos the transition logic between them:
npm run dev audio-music
Fonts
Multimodal LLMs are amazing at identifying things in images and synthesizing images, but they don't really have good taste yet. So with respect to fonts, I didn't trust an LLM to choose good fonts for a game.
I asked the coding agent to create a tool that let me manually filter and label fonts that I thought would be good for games. The label helps it choose the font when it's creating the game (a soft, playful game probably doesn't need a font with blood).
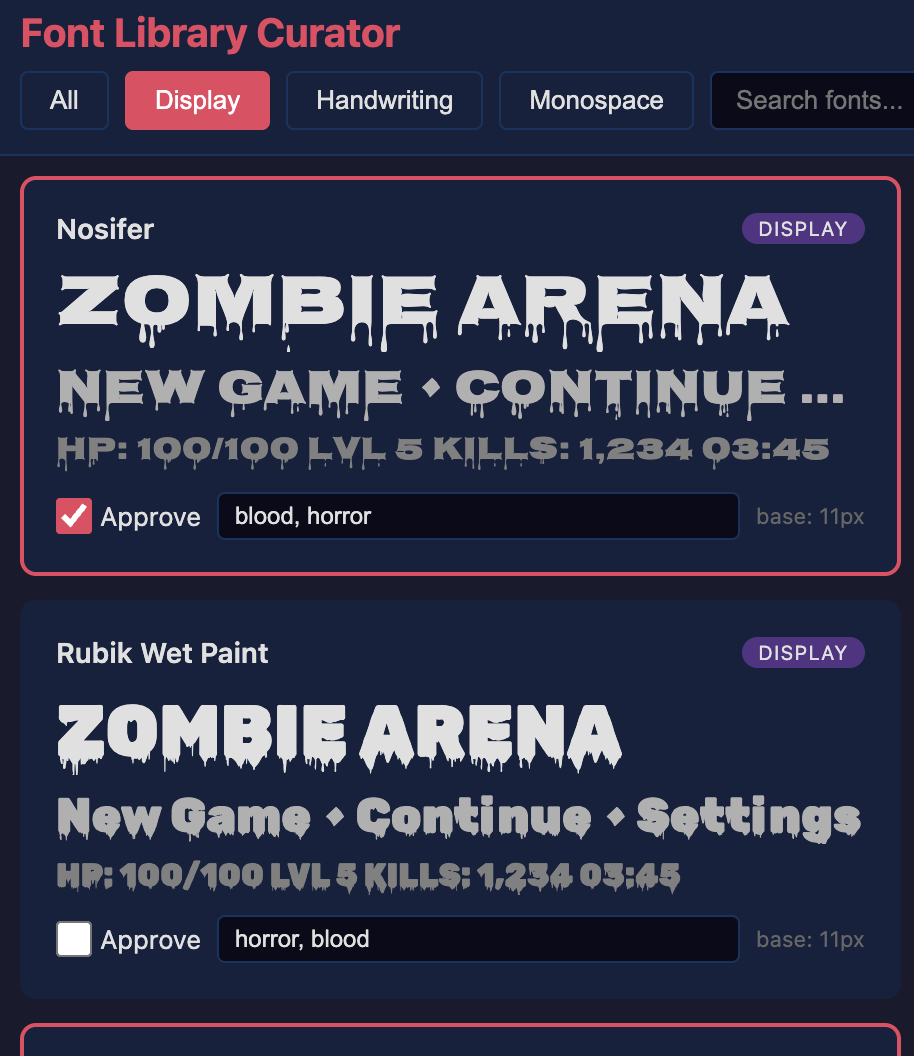
Labeling just a few dozen fonts from Google Fonts gives the coding agent something to choose from that it could use text to choose.
This font tool was built on a relatively simple starting prompt:
Conclusion & Next Steps
This project still has a ways to go before it can produce games worthy of the Steam store. One of the major problems is performance. While the rendering makes use of GPU instancing to reduce draw calls, once the graybox materials are swapped out for 3D meshes (e.g. houses in the samurai game), the framerate drops dramatically.
This is why the video at the start of the article has simple, graybox walls instead of professional looking meshes. One path forward might be to lean heavier on plants (see Foliage), which are much cheaper to draw.
Another problem is that many of the games ended up looking very similar: the camera movement, character movement, vegetation placement, etc all tend to look the same. What this kind of project really calls for is coming up with 3-5 options for each major aspect of the game.
For example, I could ask the LLM to exclusively commit to a level generation techinque from one of: cellular automata, big hand-crafted tiles randomly placed together, simple noise pattern, or wave function collapse. As it is now, there's really only one choice in each area.
I also never came up with materials to improve on the graybox ones. I would research what texture-generation services exist or even just tweak the ones that come from Meshy to make them match the game's palette.
Last, if I had more time, I wanted to use a model to stem-split the AI-generated music (extracting instrument tracks out of the song). That way, I could layer them and vary different instruments volumes depending on what was happening in the game.
Curious about hiring me or working together? Check out my hiring page. You can also hear more from me on YouTube or Twitter.